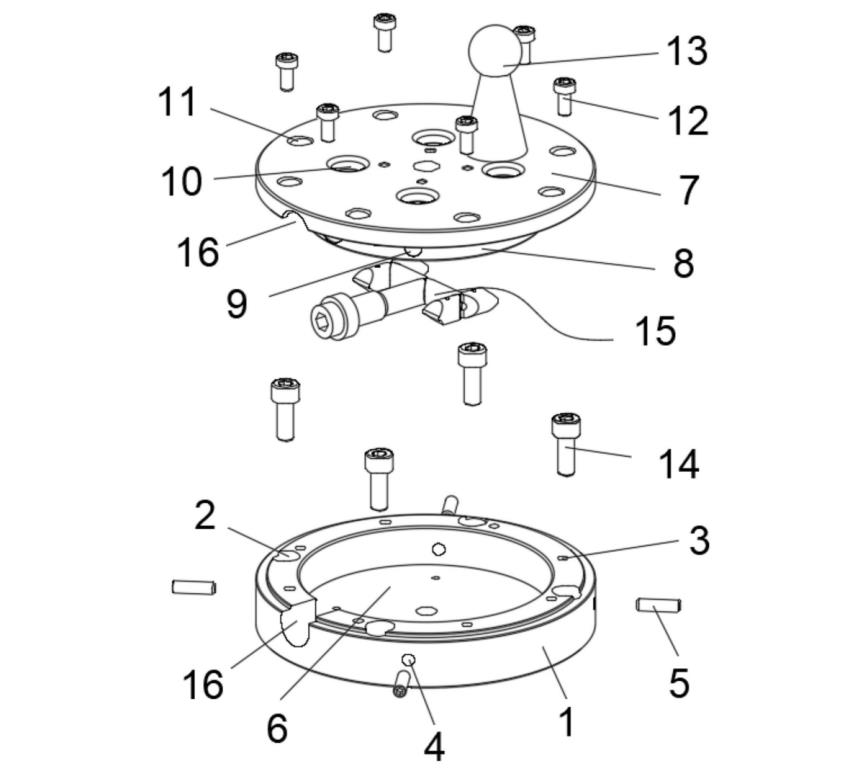
During manufacturing, some CNC machine systems may have problems when machining with a 3+2 rotary table due to the lack of a tooltip following function (RTCP), resulting in a loss of machining accuracy. To solve this problem, a new device called the CNC 5-axis leveling jig has been developed that can help machine tools achieve higher rotary accuracy.
The goal of this new device is to solve the problem of degraded machining accuracy of machine tools. Specifically, it is a device that consists of a base and a top cover. The base is secured to the disk of the 3+2 rotary table by a number of bolts. The outer wall of the base has grooves to match the bolts. The top cover has a tab on the bottom which matches the groove in the base. By means of bolts, the top cover and the base are connected together. A detection ball is fixed at the bottom of the upper cover. The peripheral wall of the base has a plurality of threaded holes, each of which contains a top wire. One end of the top wire is in contact with the outer wall of the tab.
To further enhance the performance of the device, there is a bolt hole in the top of the top cover and a threaded hole in the end face of the base so that the top cover can be bolted to the base. The location of these threaded holes is based on a specific distribution pattern.
In addition, the fit between the top wire and the base is very important. The threaded holes in the base are evenly distributed on the circumferential wall and have circular grooves at the circular wall on the tab. One end of the top wire is inserted into the corresponding circular groove, so that adjustment of concentricity can be realized.

In using this apparatus, the base is first bolted to the disk of the turntable. Then, the top cover is bolted to the base to ensure parallelism between them. The desired parallelism is achieved by adjusting the tightness of the bolts. Concentricity can then be adjusted by adjusting the length of the top wire. Once both the parallelism and concentricity errors between the top cover and the rotary table disk are less than 0.01 millimeters, the inspection ball can be fixed on the top cover.
Next, the inspection ball is calibrated in the CNC machine system using a probe. During this process, the rotary table is rotated at different angles and the probe measures data at multiple points. The system automatically calculates this data and recalibrates the rotary center of the rotary table. This helps to calibrate the machine’s center of rotation, resulting in more accurate and stable machining.
In short, this CNC 5-axis leveling jig can help solve the problem of degraded machine tool machining accuracy. It achieves a precise calibration process by securing the base and top cover, as well as using a top wire and inspection ball, which improves the machining accuracy and stability of the machine tool.
