In the manufacturing process of industrial products, engineers widely use spraying as a surface finishing technique.
Manual spraying presents numerous drawbacks, such as high labor intensity for workers and hazardous environments that threaten their health.
Currently, industries increasingly use teach-in robots in the spraying field, allowing workers to avoid harsh spraying environments while improving spray quality and efficiency.
However, teach-in robots are suitable for spraying single-variety, high-volume workpieces.
When workpiece structures or dimensions change, operators must re-teach the robot, as it adapts poorly to variations in the workpiece.
3D vision technology has now integrated with industrial robots to handle complex scenarios like welding and sorting.
3D vision sensors capture point clouds of workpieces, and algorithms process these data for positioning or feature extraction.
This enables robotic operations in random environments, effectively addressing the poor environmental adaptability of teach-in robots.
For workpieces with flat spray surfaces, their point clouds are relatively complete.
Direct slicing of the point cloud can extract contour lines from the slice interfaces as spray paths.
However, for surfaces with spatial complexity, scanned point clouds exhibit varying degrees of missing data and occlusion, preventing the acquisition of complete 3D workpiece information.
Two approaches exist to address this: using point cloud 3D model reconstruction techniques to repair gaps and generate CAD models, or constructing a model library for each workpiece to plan spray paths on the model surface.
Both methods have significant limitations: the former is unsuitable for complex curved surfaces, while the latter involves time-consuming model matching.
This paper investigates a point cloud-based robotic spraying method for complex workpieces with intricate surfaces, similar shapes, but varying dimensions.
First, engineers establish a parametric model of the workpiece.
They refine the parametric expressions using point cloud dimensional measurements, enabling rapid model reconstruction when similar workpieces have varying dimensions.
Next, they extract parametric surface data.
After classifying surfaces based on features such as holes and polygonal convexity or concavity, engineers use different methods to calculate the spray paths.
Finally, they apply higher-order polynomial interpolation to complete trajectory planning, enabling robotic motion.
Design of a Robotic Spraying System for Complex Workpieces
The gantry-shaped, trapezoidal, and other types of workpieces requiring spraying at a certain enterprise are shown in Figure 1.
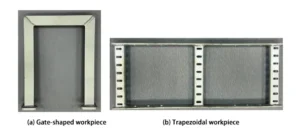
Its characteristics are: workpieces of the same type share similar shapes but vary in size;
The sprayed surfaces are not complete planes or curved surfaces, requiring decomposition into multiple planes or surfaces for sequential spraying;
Concave surfaces and perforated surfaces on the workpiece surfaces affect robot path planning;
The workpiece’s hanging posture may undergo certain changes during spraying.
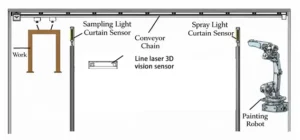
To meet the spraying requirements of such workpieces, engineers designed a robotic spraying system for complex workpieces, as shown in Figure 2.
This system comprises three main components: the workpiece conveying module, the vision processing module, and the workpiece spraying module.
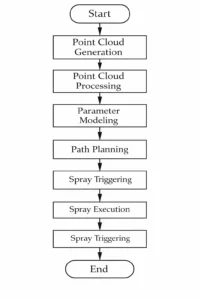
Specifically: The workpiece spraying module incorporates a spraying robot and spraying tools. The system workflow is illustrated in Figure 3.
The conveying module transports the workpiece to the image acquisition zone, where the light curtain signal triggers the 3D vision sensor to capture the workpiece image and generate a point cloud.
Engineers calculate workpiece dimensions through point cloud processing to create a parametric model.
They extract surface features from this model to plan the spray path and generate the spray trajectory in the robot base coordinate system.
They then transmit this trajectory data to the robot controller.
When the workpiece enters the spray zone, the light curtain signal triggers the robot to apply the coating along the planned path.
Point Cloud-Based Parametric Model Reconstruction of Workpieces
Workpiece Point Cloud Segmentation
To ensure imaging quality, a background plate is added behind the workpiece.
Consequently, the workpiece scene point cloud comprises the workpiece, lifting hooks, background, and other elements, as shown in Figure 4a.
Taking a gate-shaped workpiece as an example, the workpiece point cloud segmentation process is illustrated in Figure 4.
1) Background and Noise Point Cloud Removal.
Engineers segment and remove the background point cloud, which is planar, using the Randomized Consistency Sampling (RANSAC) plane fitting method, and calculate the normal vectors of the background point cloud.
They classify noise points located more than 100 mm from the workpiece as distant noise, while the remaining points are categorized as near noise.
For distant noise, they construct a parallel plane along the background point cloud’s normal direction that contains the workpiece point cloud, retaining the points between the two planes.
For near-distance noise, they use RANSAC plane fitting to model the sprayed surface of the workpiece’s front face.
Engineers construct a near-distance parallel plane along the workpiece point cloud’s normal direction, retaining the points between the two planes.
They also apply statistical filtering to remove outlier noise.
The point cloud after background and noise removal is shown in Figure 4b.
2) Removal of hook point cloud. Construct the hook segmentation plane as shown in Figure 4b to remove the hook point cloud above the segmentation plane.
Perform RANSAC line fitting on the hook point cloud to obtain the hook direction vectors L and R.
Construct a cylindrical region with the direction vectors as axes and the hook bend dimensions as radii, as shown in Figure 4c.
Remove the hook bend point cloud within this cylindrical region, as shown in Figure 4d.
3) Lifting Point Position Calculation. Determine the intersection points of direction vectors L and R with the upper surface, i.e., the left and right lifting point positions as shown in Table 1.
These positions are used for robot path planning to avoid the hook.

4) Determining the Principal Direction of the Point Cloud.
Calculating the principal direction of the point cloud is essential for point cloud projection and workpiece dimension calculation.
Due to potential gaps in the scanned point cloud and the non-symmetry of the workpiece, directly applying principal component analysis (PCA) cannot accurately determine the workpiece’s principal direction.
Engineers calculate the coordinate axes based on the workpiece features:
Define the direction vector D along the intersection line between the front face and the top surface as the X-axis;
The cross product of the Z and X axes defines the Y-axis.
Parametric Model Reconstruction of Workpieces
Establish a parametric model for workpieces of the same type.
Calculate the parameters of the current workpiece through point cloud projection slicing to perform parametric model reconstruction.
The steps are as follows.
1) Dimension Calculation.
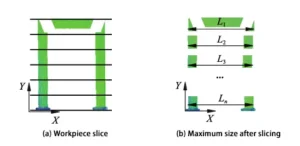
Taking the workpiece length L as an example (see Figure 5), project the point cloud along the Z-axis onto the XOY plane.
Construct a set of parallel planes parallel to the XOY plane to slice the point cloud.
Calculate the maximum dimension of the point cloud along the X-direction after n slices, and determine the average value using Equation (1).
.png)
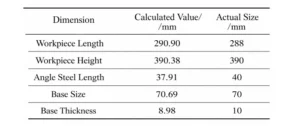
The dimensional calculation results for the gate-shaped workpiece are shown in Table 2.
The deviation from the actual dimensions is 2.90 mm, which aligns well with the actual measurements and meets the requirements for spraying.
2) Model Reconstruction.
Engineers use a computational dimension correction method to modify the workpiece model, creating a parametric model of the workpiece.
Compared to point cloud-driven 3D reconstruction, parametric modeling imposes lower demands on point cloud quality.
Furthermore, this approach eliminates the need to create individual models for each workpiece, reducing index matching time in the model library and enhancing operational speed.
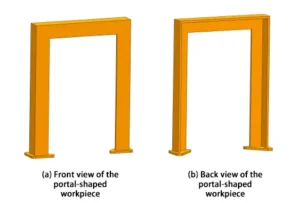
The parametric model reconstruction results for the gate-shaped workpiece are shown in Figure 6.
Robot Spray Path Planning
Classify the extracted spray surfaces to generate single-surface spray paths.
Engineers then optimize and combine these paths to form continuous spatial paths.
Finally, they use polynomial interpolation to complete the robot trajectory planning.
Classification of Spray Surfaces
Workpiece spray surface characteristics include surface type, surface vertices, plane normals, polygon concavity/convexity, and surface contours.
Engineers use concavity/convexity and surface contours to classify surfaces, plane normals to determine the path offset direction, and surface vertices to generate path points.
Based on the structure of the sprayed workpieces, they classify the spray surfaces as follows.
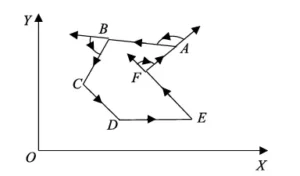
1) Classify sprayed surfaces as concave or convex based on convexity, as shown in Figure 7.
The specific methods for determining convexity are as follows:
① Compute the cross product of adjacent edge direction vectors.
Using Figure 7 as an example, calculate the cross product of all adjacent edge direction vectors in a counterclockwise direction.
② Determine vertex convexity. Multiply all cross product values by the plane normal vector.
If the result is positive, the point is convex.
Taking point A as an example, its Pcrossvalue is positive according to Equation 2, thus point A is convex. Applying the same method to all points, point F yields a negative result, making it concave.
Engineers classify a surface that contains concave points as concave.
-300x55.png)
In the equation: n is the plane normal vector.
2) Classify surfaces into closed surfaces and perforated surfaces based on the presence or absence of multiply connected regions.
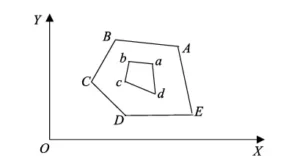
As shown in Figure 8, the method for determining multiply connected regions is as follows: 1) Calculate the number of surface contours.
Extract the contour of a sprayed surface on the XOY plane and count its number.
If the number of contours exceeds 1, the surface contains multiply connected regions; 2.
Distinguish between inner and outer contours. Select one contour line (e.g., ABCDE) and calculate its vertex coordinate extremes: maxX, maxY, minX, minY.
If the difference between the xi, yicoordinates of other contour line vertices and these extremes (as per Equation 3) yields negative signs for all differences, the contour line is an outer contour; otherwise, it is an inner contour.
.png)
Spray Path Generation
Closed convex surfaces can generate paths directly.
Directly generating paths for other surface types increases the spray gun’s idle stroke length and reduces spraying efficiency.
Engineers segment the surfaces until each segmented surface becomes a closed convex surface.
They then generate paths using the sweep line method.
1) Segmentation Method: Based on the geometric characteristics of hole edges and polygon boundaries, the spray surface is divided into multiple closed convex surfaces.
2) Path Generation Using the Sweep Line Method. Select the longest edge of the surface as the initial sweep line.
Construct a set of lines parallel to this initial line within the plane.
Offset this set of lines along the plane’s normal direction and connect their ends sequentially to generate a spray path at a specific distance from the surface.
3) Path optimization and combination.
Engineers construct a target function to traverse all paths, following the robot’s shortest motion path principle.
They incorporate factors such as sub-patch convexity/concavity, idle stroke length, path turning frequency, and shared edge length to optimize the spray path.
Establishing Trajectory Parametric Equations
To reduce trajectory planning time for motion controllers, engineers adopt a high-order polynomial trajectory planning method.
They integrate the start and end boundary conditions to derive the trajectory parametric equations for the high-order polynomial, where the displacement (s) varies with time as follows:
-300x60.png)
In the formula: S represents the total length of the motion path; t denotes the time taken by the robot to complete a segment of path motion; t₀ is the current motion time.
Spray System Construction and Testing
Robotic System Construction and Calibration
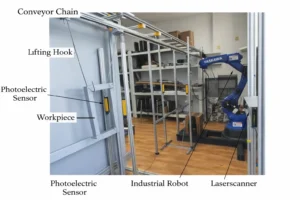
The robotic spray system construction is shown in Figure 9.
The system consists of three components: the workpiece transfer module, the vision processing module, and the workpiece spraying module.
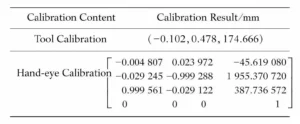
Based on the six-point calibration principle of the industrial robot tool center frame (TCF), the pose BTT of the tool tip in the base coordinate system is obtained.
Because of the significant distance between the vision sensor and the robot, engineers cannot use traditional eye-to-hand calibration methods.
They investigate a calibration method based on the direction vector of the conveyor chain, with the results shown in Table 3.
Engineers suspend the calibration plate on the conveyor chain and follow these specific steps:
1) Move the calibration plate on the conveyor chain to the image capture zone.
Obtain the transformation matrix CWT for the calibration plate coordinate system in the image capture zone relative to the camera coordinate system through camera calibration.
2) Complete the calibration of the conveyor chain direction vector.
Move the calibration plate to the spraying zone and record the travel distance along the conveyor direction.
Apply the CWT coordinate transformation to obtain the transformation matrix CWT for the spraying zone calibration plate coordinate system relative to the camera coordinate system.
3) Align the robot user coordinate system with the spray zone calibration plate coordinate system to obtain the transformation matrix BWT for the spray zone calibration plate coordinate system relative to the robot base coordinate system.
Using Equation (5), derive the transformation matrix BCT between the camera coordinate system and the robot base coordinate system, thereby completing long-range hand-eye calibration.

Engineers use the calibration results to transform the trajectory planning results from the model coordinate system to the robot base coordinate system, obtaining the position and orientation of the spray execution points.
Experiment and Analysis
Design spray system software, including point cloud generation and processing, model parametric reconstruction, robot trajectory planning and spray simulation, robot motion control, etc.
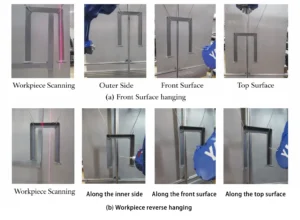
The experimental process is shown in Figure 10.
① The workpiece moves along the conveyor chain. When entering the image capture zone, a light curtain signal triggers the camera to scan and process the workpiece point cloud.
②As the robot moves toward the spraying zone, engineers complete parametric model reconstruction and trajectory planning.
They generate the trajectory data in the robot base coordinate system and send it to the robot controller.
③ Upon entering the spraying zone, the robot moves along the planned trajectory to perform the spraying operation.
Engineers tested the robotic spraying system.
Whether the workpiece was suspended hook-up or hook-down, and without strict requirements on its suspension posture, the system consistently generated the workpiece’s parametric model and the corresponding robotic trajectory.
The robot successfully executed movements along the planned trajectory, laying the foundation for subsequent workpiece spraying trials.
Conclusion
Researchers investigated a robotic spraying method for complex workpieces based on 3D point cloud processing.
First, they calculate workpiece dimensions through 3D point cloud processing to reconstruct a parametric model of the workpiece.
This approach eliminates the need to create individual models for each workpiece, reducing model library construction time while enhancing the spraying system’s adaptability.
Second, engineers perform robot trajectory planning based on feature surface extraction.
Combining feature surface classification and segmentation, a scanning method generated spray paths.
Engineers use high-order polynomial functions for robot trajectory planning, effectively addressing path planning challenges such as concave surfaces and regions with complex connectivity.
Finally, they construct and test the robotic spraying system.
Results demonstrate that the system reliably generates three-dimensional models of workpieces and performs robotic trajectory planning based on these models.
The robot can move along the planned trajectory on the workpiece surface, facilitating subsequent spraying experiments.
